Camping crafts for kids are perfect and fun activity to fill family holidays. Spending some quality time through camping provides an incredible opportunity to create cherished moments with loved ones.
It offers children a chance to venture into the wonders of the natural world, acquire fresh abilities, and forge timeless recollections.
One way to enhance the camping experience for kids is by engaging them in fun and creative crafts. Within this article, we shall explore a variety of camping crafts designed for children of all ages.
1. Nature Collage
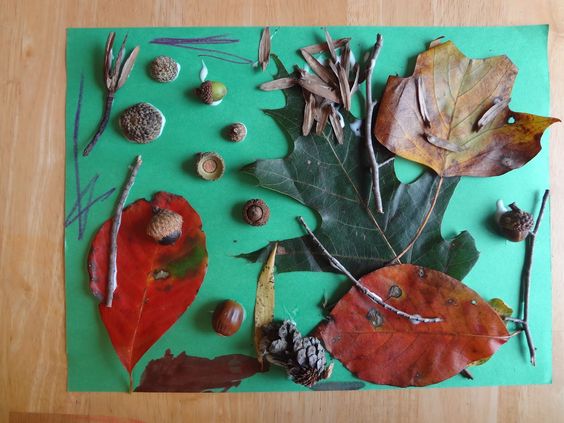
Encourage kids to collect leaves, flowers, twigs, and other natural materials found around the campsite. Provide them with glue, paper, and markers, and let their imagination run wild.
Engaging in this activity not only sparks their imaginative prowess but also nurtures a deepened appreciation for the awe-inspiring wonders of the natural world.
To Make Your Own Nature Collage
Here’s a step-by-step guide on how to make your own nature collage:
- Start by venturing out into nature and collecting various materials that catch your eye. Look for fallen leaves, flowers, twigs, feathers, small pebbles, or anything else that captures your interest.
- Allocate a moment to organize the materials you have gathered. Group them by color, shape, or texture to help you visualize how you want your collage to come together.
- Choose a sturdy base for your collage, such as a thick piece of cardboard, a canvas, or a wooden board. The size of the base will depend on your preference and the amount of space you want to fill with your collage.
- Prior to adhering any elements, pause momentarily to outline the design blueprint. Think about the composition and arrangement of the materials. Consider creating a focal point or incorporating different variety of textures and shapes to infuse captivating visual allure.
- Begin attaching the materials to your base using a glue, a glue gun, or even double-sided tape depending on the weight and size of the materials. Be mindful of the placement and make adjustments as you go along.
- Embrace the spirit of experimentation and venture into diverse arrangements without fear. Play with the placement of the materials, overlapping them or layering them to create depth and dimension. Allow your intuition to guide you as you bring your vision to life.
- You can include photographs, drawings, or small mementos that hold special meaning to you. These additions will infuse your artwork with personal memories and emotions.
2. Rock Painting
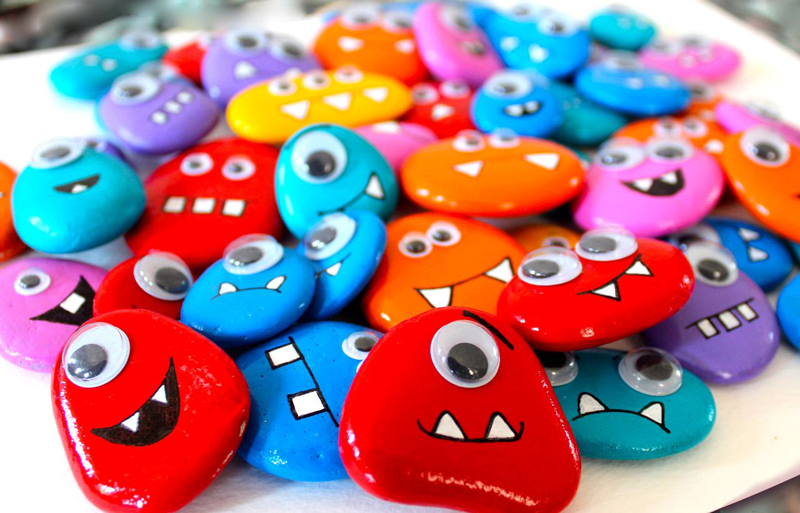
Camping often presents opportunities to find unique rocks and pebbles. Provide children with paintbrushes, acrylic paint, and markers, and let them transform ordinary rocks into colorful art.
They can create animals, patterns, or simply let their imagination guide them. The finished painted rocks can be used as paperweights or decorations for the campsite.
3. Twig Picture Frames
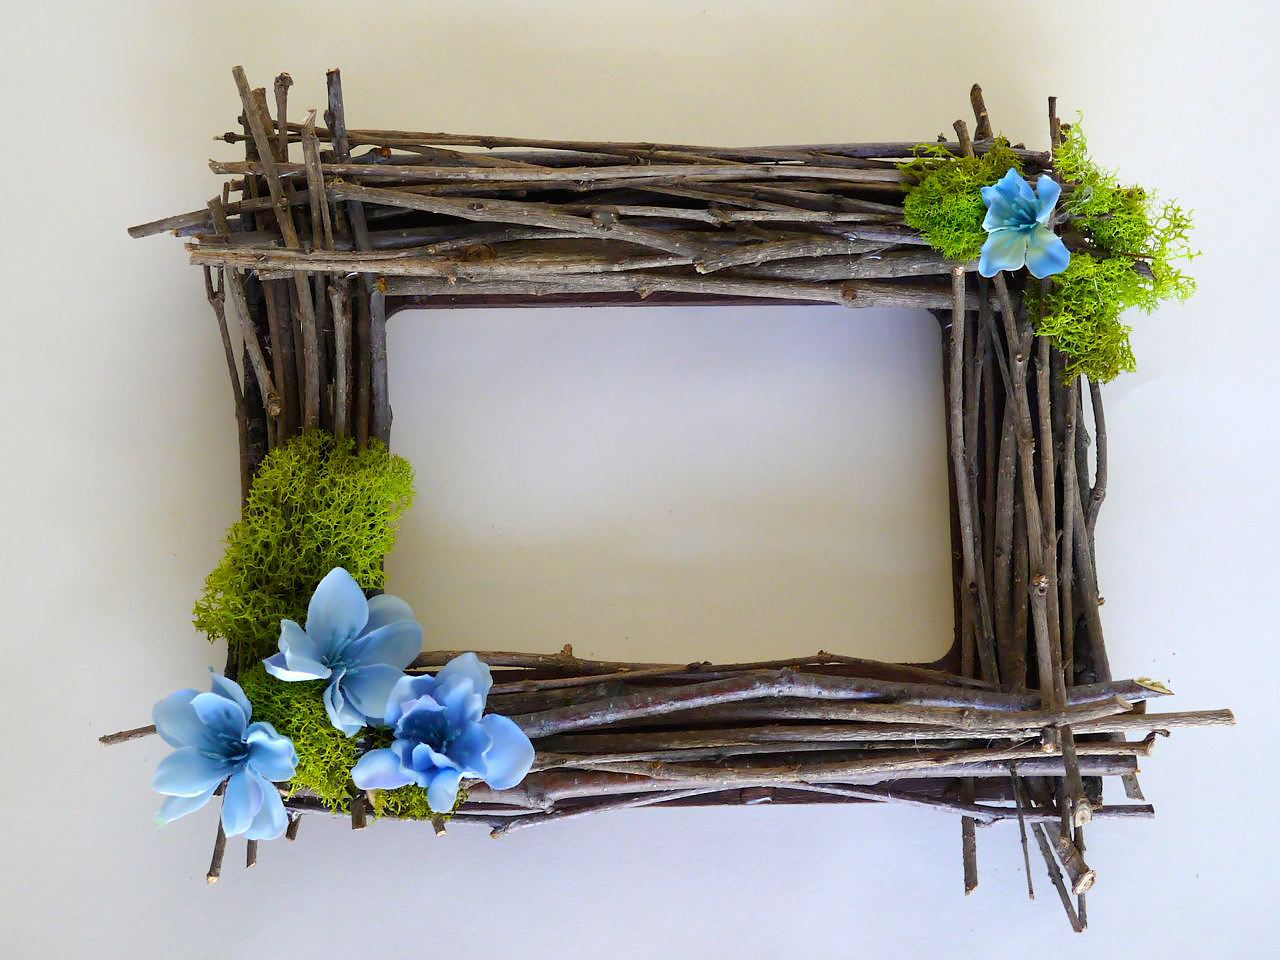
Gather some small twigs and bring along some string or twine. Help the kids shape the twigs into picture frames and use the string to tie them together.
Once the frames are ready, they can be decorated with leaves, flowers, or small pebbles found in the camping area.
Children can then use these frames to display their favorite camping crafts for kids memories.
To Make Your Own Twig Picture Frames
You can make your own twig picture frames by following the step-by-step guide:
- Look for twigs that are relatively straight and sturdy. You’ll also need a pair of pruning shears or sturdy scissors to trim the twigs to the desired size.
- Lay down some newspaper or a protective covering on a flat surface, to catch any debris or glue that may fall during the crafting process.
- Choose the photograph you want to frame. It could be a special memory from a camping trip, a beautiful landscape, or a cherished family picture.
- Take precise measurements of your photograph’s dimensions and incorporate an extra inch or two to each side to accommodate the frame border. This will determine the size of your twig frame.
- Using pruning shears or sturdy scissors, trim the twigs to the desired lengths. Cut them slightly longer than the measurements you marked, as you can always trim them further later.
- Take four twigs that will serve as the frame borders. Place them along the marked measurements on your workspace. Ensure that the corners of the twigs align neatly to form a rectangular or square shape. Trim the twigs if necessary to achieve a uniform size and shape.
- Using a strong adhesive, apply a small amount of it to one end of a twig and firmly against the adjacent twig, ensuring a secure bond. Continue gluing the twigs together along the edges until you have formed a complete frame. Apply extra adhesive to the junctions where the twigs intersect, ensuring a sturdy construction.
- Place your photograph within the frame and ensure it is centered. Use small pieces of double-sided tape to secure the photograph to the back of the frame, this will prevent it from slipping within the frame.
4. Leaf Prints
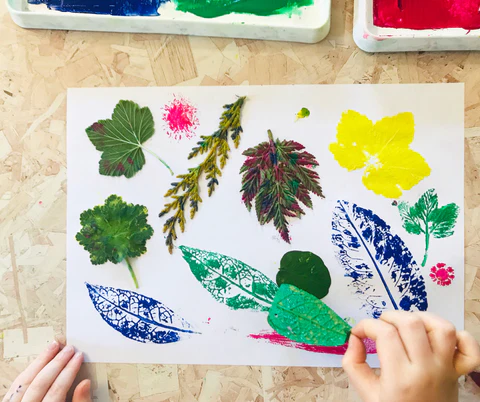
Encourage children to explore the different shapes and textures of leaves they find during their camping crafts for kids adventure. Collect some leaves and bring along washable paint and paper.
Show them how to apply paint to one side of a leaf and then press it onto the paper, creating a beautiful leaf print.
This hands-on and artistic activity provides children with an opportunity to connect with nature in a meaningful and interactive manner.
5. Dream Catchers
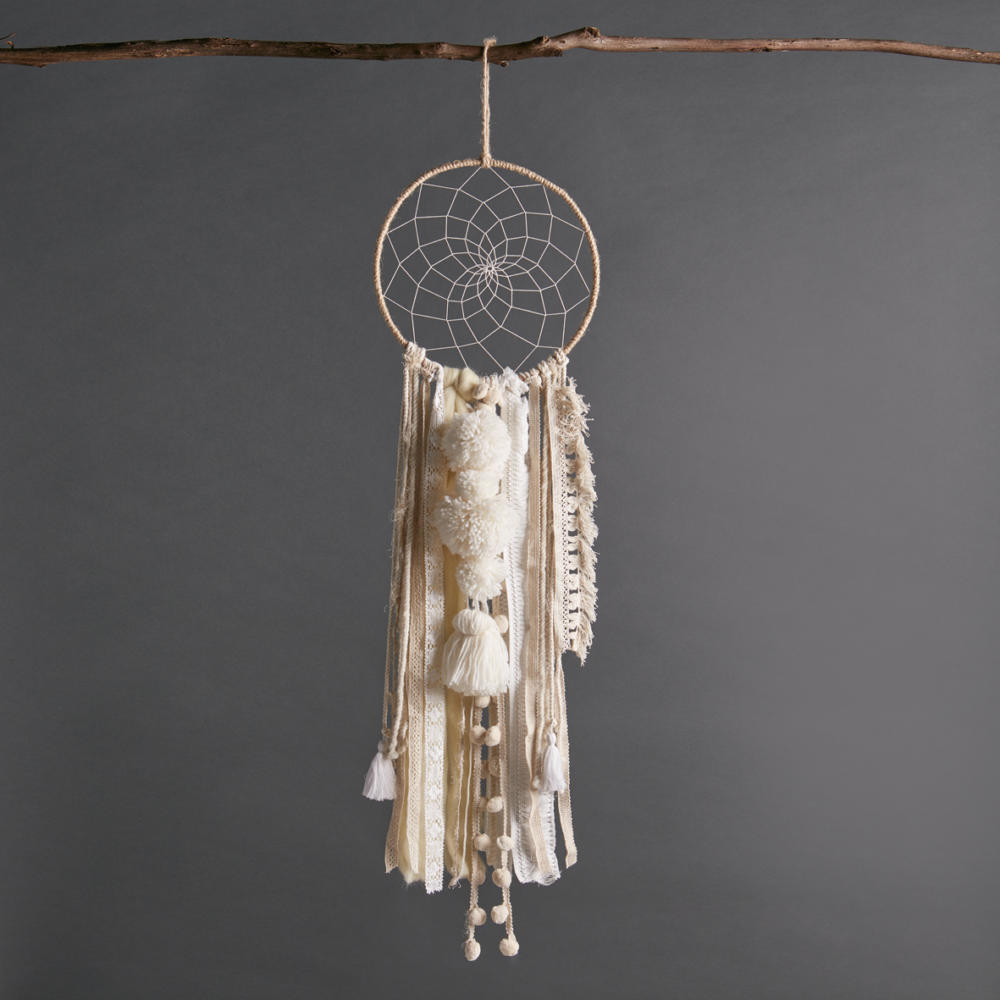
Teach children about the Native American tradition of dream catchers. Provide them with hoops, yarn, feathers, and beads.
Demonstrate the intricate weaving of yarn within the hoop, guiding them through the process, and encourage them to embellish the dream catchers with feathers and beads as they please.
Hang the finished dream catchers in their tents to bring good dreams during their camping nights.
To Make Your Own Dream Catcher
Here are the step-by-step instructions on how to create your own dream catcher:
- First, you will need a hoop as the base. You can use a metal hoop, a wooden embroidery hoop, or even a bent twig. Other materials include string or yarn, beads, feathers, and decorative elements like ribbons or fabric strips.
- If you are using a metal hoop, you can leave it as is. If you prefer a more rustic look, you can wrap the hoop with twine, ribbon, or fabric, securing the material with glue as you go.
- Commence by securing a knot at a designated spot on the hoop. Then, create a loop by tying the string or yarn around the hoop, leaving a tail.
- Pass the string across the hoop, looping it over the anchor point. Continue this process, encircling the hoop in a continuous pattern, adhering to the circular motion. After each loop, pull the string slightly to create tension.
- As you weave, you can incorporate beads or other decorative elements into the dream catcher design. Thread beads onto the string, allowing them to hang freely within the web.
- Seize feathers to the base of the dream catcher as a traditional symbol. Tie a yarn to the bottom of the hoop and attach feathers to the end of each string. You can also incorporate beads or additional decorative elements into the feather strings.
- For additional decorative elements, you can attach ribbons, fabric strips, or small trinkets that hold personal meaning.
- Once you’re satisfied with the web, beads, feathers, and decorations, carefully secure all the loose ends. Trim any excess string, ensuring that everything is firmly in place.
6. Nature Bracelets

Give each child a strip of duct tape, sticky side out, and let them create their own nature bracelets.
As they explore the camping area, they can stick small leaves, flowers, or even feathers onto their bracelets, creating a unique wearable souvenir from their camping trip.
7. Campfire Story Stones
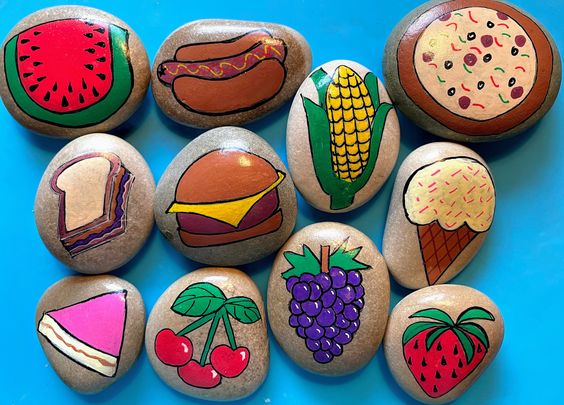
Invite children to find smooth stones and use acrylic paint to create story stones. Each stone can depict a different character, object, or scene that can be used to inspire storytelling around the campfire.
Encourage them to share their imaginative tales, creating a sense of wonder and creativity during the camping trip.
To Make Your Own Campfire Story Stones
To make campfire story stones, you can follow these instructions:
- Materials needed are smooth stones of various shapes and sizes, acrylic paint in different colors, paintbrushes, and a waterproof sealer. Ensure that the stones are of sufficient size to allow for comfortable painting.
- Imagine the story themes you want to depict on the stones. Common themes include animals, nature, adventure, fantasy, or any other ideas that inspire your storytelling.
- Thoroughly clean the stones to eliminate any filth or spoilage. After rinsing the stones with water, ensure they are left to dry completely. Preparing a clean surface ensures that the paint adheres properly.
- Using a paintbrush, apply a solid base color to each stone. Ensure that it dry completely before proceeding to the subsequent step.
- Sketch the chosen images lightly on each stone using a pencil. No rush and make sure the lines are crisp and visible.
- Once satisfied with the sketches, begin painting the images using acrylic paint. Utilize fine-tipped brushes when working on smaller details, and opt for broader brushes when covering larger areas.
- Add details and highlights to make the images come to life. Use different shades of paint to add depth and dimension.
- To protect the painted designs, apply a waterproof sealer over the entire surface of each stone. This will ensure that the images remain intact even when exposed to outdoor elements during camping trips.
8. Camping Crafts for Kids: Lanterns
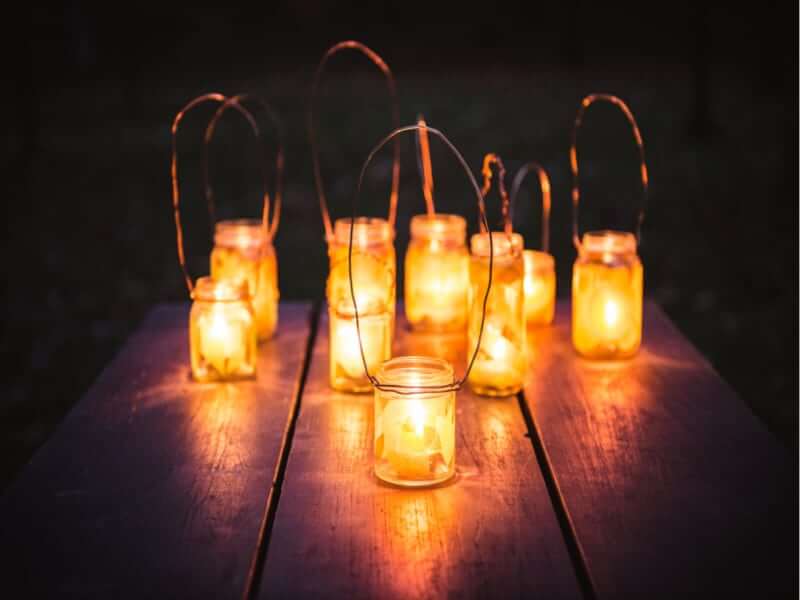
Camping is not complete without some cozy lighting. Help children make their own lanterns using empty glass jars, tissue paper, and glue.
Let them cut or tear the tissue paper into small pieces and then use the glue to adhere them to the outside of the jar.
Once the glue dries, place a tea light inside the jar, and the lanterns will create a warm and magical atmosphere at the campsite.
9. Friendship Bracelets

Teach kids the art of crafting friendship bracelets with embroidery thread. They can create colorful patterns and exchange bracelets with their camping companions as a symbol of their friendship.
To Make Your Own Friendship Bracelets
Here is how to make friendship bracelets:
- Choose embroidery thread or yarn in various colors. Scissors, tape, and a clipboard will also come in handy.
- Measure the desired length for your bracelet by wrapping the thread around your wrist or the wrist of the person you’re making it for.
- Add a few extra inches to allow for tying knots and adjusting the bracelet’s size. Cut multiple strands of thread in this length, ensuring you have enough to create a full bracelet.
- Bring the strands of thread together and create a knot at one end, ensuring to leave a small tail. You can tape the knotted end to a flat surface or secure it with a clipboard or safety pin. This will keep your threads in place as you weave the bracelet.
- Divide the threads into groups, usually two to four strands per group, depending on the thickness you want for your bracelet. Arrange the groups in the order you want the colors to appear.
- Using the group of threads on the left, create a forward knot by crossing the leftmost thread over the threads in the middle and pulling it through the opening created.
- For added flair, you can incorporate beads into your bracelet. Thread a bead onto one or more of the strands before creating a knot. Position the bead where you want it to appear in the bracelet’s design.
- When you’ve achieved the desired length, fasten the threads by tying a knot at the end to ensure their security. You can either tie a simple knot or create a loop and pull the ends through it for a sliding closure that allows for adjustable sizing.
10. Nature Mobiles
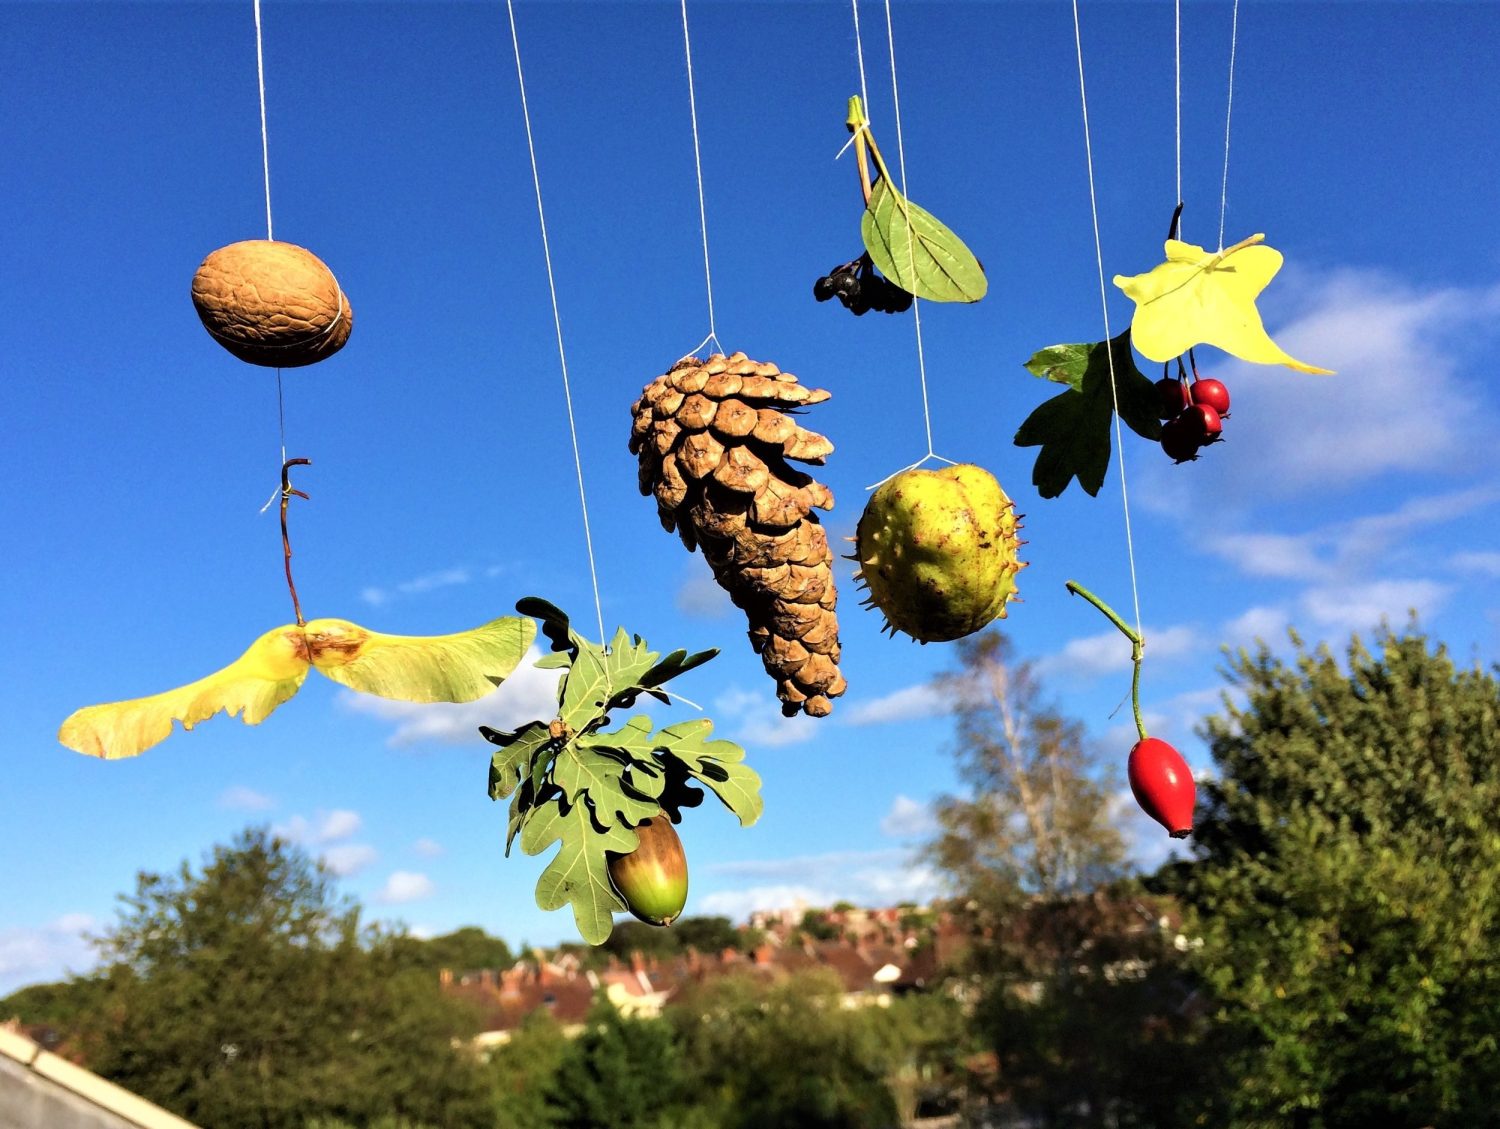
Encourage kids to collect small branches, pinecones, and other natural objects they find during their camping adventure.
Using twine or string, help them create mobiles by attaching these natural treasures to the branches.
Hang the mobiles in their tents or around the campsite, adding a touch of nature’s beauty to the surroundings.
Camping crafts for kids provide not only entertainment but also educational and developmental benefits.
Therefore, when preparing for your next camping adventure with children, be sure to include a selection of camping crafts for kids supplies in your packing list.